
USART Communication in STM32F4 With STD Periphals and NVIC
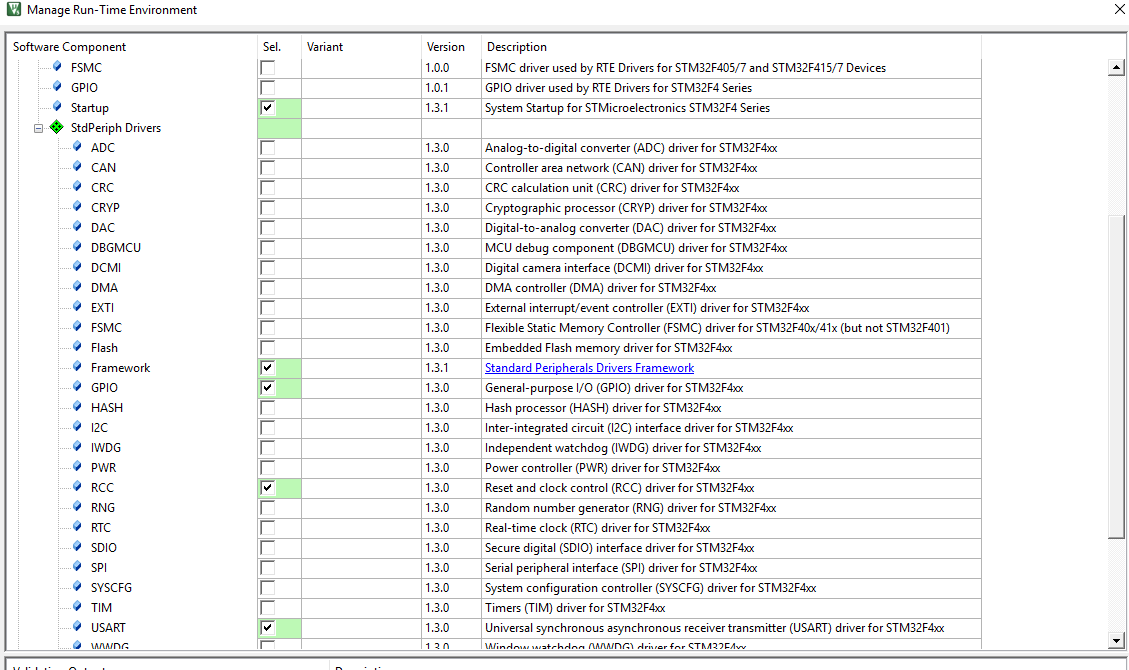
Hello everyone, in this article we are going to talk about USART Communication with STM32F4 using STD Periphals. In this application we will use the STM32F4-DISCO discovery board and we will write somethings to the serial port via USART hardware of Discovery board.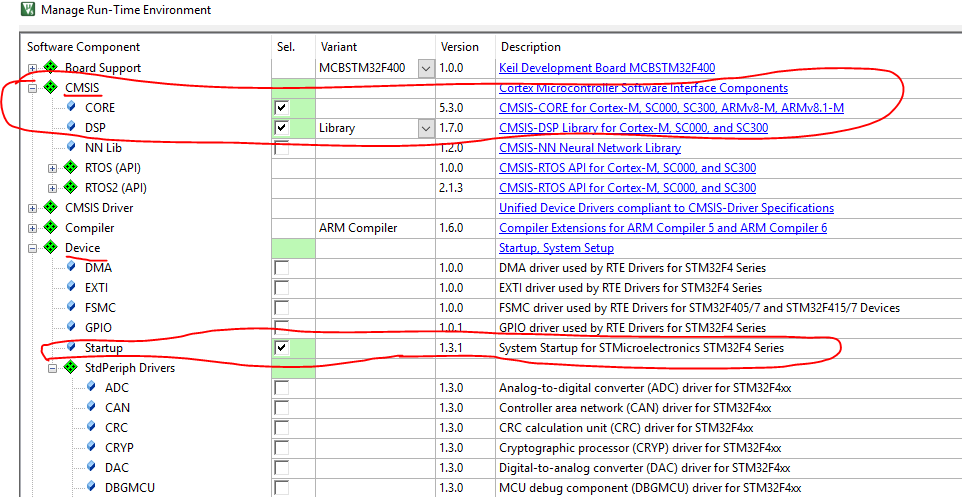
First include the below headers in our main file:
#include "stm32f4xx.h"                  // Device header
#include <stdio.h>
#include <stdlib.h>
	//GPIO and USART global structures
	GPIO_InitTypeDef GPIO_InitStructure;
	USART_InitTypeDef USART_InitStructure;

	//USART2 is connected to APB1 Periph Clock Bus and we enabled it.
	RCC_APB1PeriphClockCmd(RCC_APB1Periph_USART2, ENABLE);

	//GPIOA is connected to AHB1 Periph Clock Bus and we enabled it.
	RCC_AHB1PeriphClockCmd(RCC_AHB1Periph_GPIOA, ENABLE);
Now we have to configurate the GPIO and USART layers. In here we will set the PA2 pin to send serial data and PA3 to receive serial data on USART2. After configuration of GPIO we need to set the USART settings. We will set the parity, baudrate stopbits etc... so what configs do we need to communicate on serial port.
	//Configuration of the GPIO pin for communication
	GPIO_InitStructure.GPIO_Mode  = GPIO_Mode_AF; //This is important. We will this pin except of INPUT, OUTPUT and ANALOG so we set as Alternate Function
	GPIO_InitStructure.GPIO_Pin   = GPIO_Pin_2 | GPIO_Pin_3;   //Communicate on PA2 and PA3
	GPIO_InitStructure.GPIO_OType = GPIO_OType_PP;//We set the pin as Push Pull
	GPIO_InitStructure.GPIO_PuPd  = GPIO_PuPd_UP; //And Pull Up. Keep it always on HIGH
	GPIO_InitStructure.GPIO_Speed	= GPIO_Speed_50MHz; //And pin frequency
	GPIO_Init(GPIOA, &GPIO_InitStructure);

	//When we set a pin as Alternate Function, we need to specify what function do we use for, here we specified it as USART 2
	GPIO_PinAFConfig(GPIOA, GPIO_PinSource2, GPIO_AF_USART2);
	GPIO_PinAFConfig(GPIOA, GPIO_PinSource3, GPIO_AF_USART2);


	USART_InitStructure.USART_BaudRate 	              = 9600; //Set the baudrate. Hw many datas will be sent in a second.
	USART_InitStructure.USART_HardwareFlowControl     = USART_HardwareFlowControl_None;  //Do not check the data transmitted
	USART_InitStructure.USART_Mode                    = USART_Mode_Tx | USART_Mode_Rx;//Data tansmission modes
	USART_InitStructure.USART_Parity                  = USART_Parity_No; // USART parity settings
	USART_InitStructure.USART_StopBits                = USART_StopBits_1; /Set the stop bits
	USART_InitStructure.USART_WordLength              = USART_WordLength_8b;  //we will send the 8bit data
	USART_Init(USART2, &USART_InitStructure);   //and started the this configuration

	USART_Cmd(USART2, ENABLE); //USART is activated and ready to use
After configuration we can send datas now. First we will built a function. This function will check the USART module is avail and if it is avail send the data on selected USART module.
void fnc_sendUSART(USART_TypeDef *USARTx, volatile char *s) //
{
	while(*s) //do it for all characters
	{
		//Check the USASRT modul is avail, if we do not check our data will be disturbed
		while( !(USARTx ->SR & 0x00000040) ){}

		USART_SendData(USARTx, *s); //send a character
		*s++; //go the next character

	}
}
char str[50]; /this variable will keep the datas to send
fnc_sendUSART(USART2, str);
Note: If you do not wait for a while after sending data and you send too many datas in a second, your computer probably go in Blue Screen error. To avoid this you should wait i bit on your MCU side to prevent a blue screen error.
Now I will show you how to enable Interrupt on STM32F4 STD Periph, but I will not use it to send data .
At configuration section first we have to create an NVIC Structure variable and we should make our configurations.
	NVIC_InitTypeDef NVIC_InitStructure; //NVIC structure variable

  	/* Enable the USARTx Interrupt */
  	NVIC_InitStructure.NVIC_IRQChannel = USART2_IRQn; // We will use this channel to use USART2 NVIC
  	NVIC_InitStructure.NVIC_IRQChannelPreemptionPriority = 1; //set the this NVIC priority
 	 NVIC_InitStructure.NVIC_IRQChannelSubPriority = 1;
 	 NVIC_InitStructure.NVIC_IRQChannelCmd = ENABLE; //ENABLE the NVIC
 	 NVIC_Init(&NVIC_InitStructure); //And submit the NVIC with USART2

	USART_Cmd(USART2, ENABLE); //USART is activated and ready to use
//name of this fnction must be as same as the  NVIC_InitStructure.NVIC_IRQChannel -- This is too important for the interrupting
int16_t received_char_counter = 0;
int16_t sent_char_counter = 0;
void USART2_IRQHandler(void)
{
	//in here we will check the data incoming or going
	//Receiving the data
	if (USART_GetITStatus(USART2, USART_IT_RXNE) == SET)
	{
		//To receive data and locate them into our char variable.
		str[received_char_counter++] = USART_ReceiveData(USART2);
	}

	//Sending the data
	if (USART_GetITStatus(USART2, USART_IT_TXE) == SET)
	{
		USART_SendData(USART2, str[sent_char_counter ++]);
	}
}
With the above code you can use the NVIC hardware with USART.
That is all in this article.
Have a good coding.
Burak Hamdi TUFAN
Tags
Share this Post
Author

I am a software developer experienced 15 years and here to share all my programming experiences. I have worked on so many platforms and programming languages especially C, C#, C++ and Java. I am studing PhD at Kocaeli University on Aviation Technologies. I am building softwares and technologies on aviation.

Comments