
Control a DC Motor with STM32F4 and H-Bridge
Hello everyone, in this article we are going to talk about how can we control a DC motor with H-Bridge and STM32F4 Std Periph library. First we will built a simple schematic on altium designer and after it we are going to write some codes.Now lets get started then...
I drew a schematic with basic H-Bridge configuration. I will supply big valued current so I have used IGBT instead of BJT transistor. I have located a header with two poles and I will connect the motor inputs to these header. I also located Diodes and a capacitor with ground to protect our circuit.
This schematic is the most simple H-Bridge circuit. I strongly recommend to add additional protection components and circuits. Because you will need to protect your circuit from overloading and overcurrenting or something else problems. So let's keep talking about controlling.
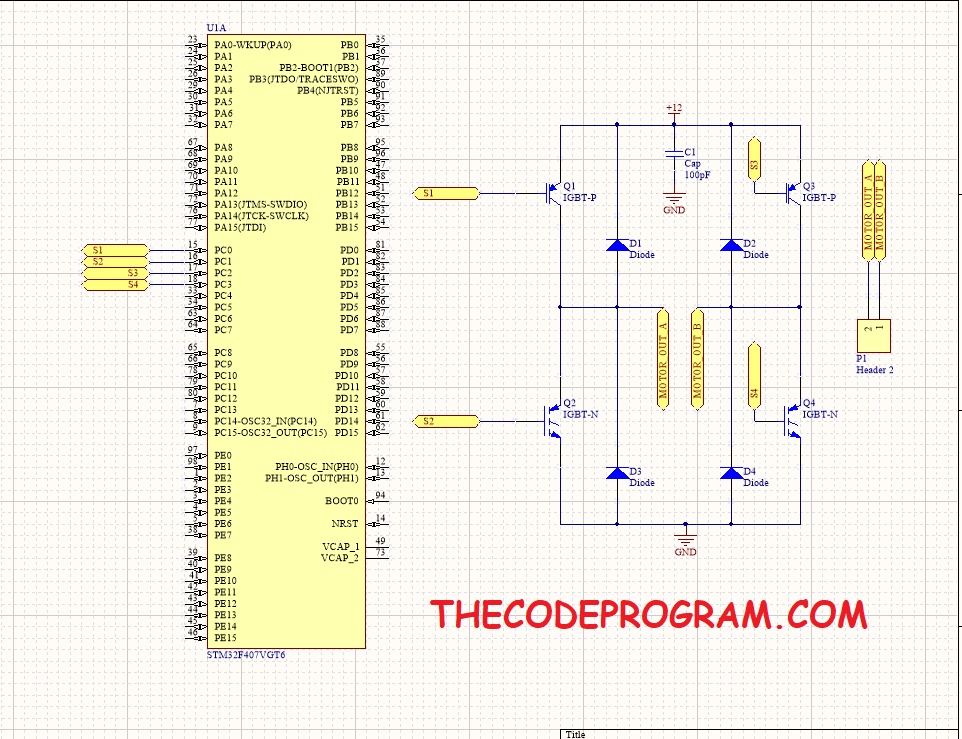
As you can see the schematic above we have connected the PC0, PC1, PC2 and PC3 pins to the related inputs on the H-Bridge circuit. I also connected the 12V to supply energy to the circuit.
We will also use two pins to control the direction of the motor rotation. We will connect some push button to the PC4 and PC5 pins.
Create a Keil uVision project and configure pins for controlling the driver switches.
//First enable the clock bus of C port of the STM32F4
RCC_AHB1PeriphClockCmd(RCC_AHB1Periph_GPIOC, ENABLE);
	GPIO_InitTypeDef GPIO_InitStruct;
	//Set the pin working mode as output.
	GPIO_InitStruct.GPIO_Mode = GPIO_Mode_OUT;
	GPIO_InitStruct.GPIO_OType = GPIO_OType_PP;
	//Set the required pins
	GPIO_InitStruct.GPIO_Pin = GPIO_Pin_0 | GPIO_Pin_1 | GPIO_Pin_2 | GPIO_Pin_3 | GPIO_Pin_4 | GPIO_Pin_5;
	GPIO_InitStruct.GPIO_PuPd = GPIO_PuPd_UP;
	GPIO_InitStruct.GPIO_Speed = GPIO_Speed_50MHz;
	//And initialize the configuration.
	GPIO_Init(GPIOC, &GPIO_InitStruct);
void fnc_rotateCW(void){
	GPIO_ResetBits(GPIOC, GPIO_Pin_0);
	GPIO_ResetBits(GPIOC, GPIO_Pin_3);
	GPIO_SetBits(GPIOC, GPIO_Pin_1);
	GPIO_SetBits(GPIOC, GPIO_Pin_2);
}
void fnc_rotateCCW(void){
	GPIO_ResetBits(GPIOC, GPIO_Pin_1);
	GPIO_ResetBits(GPIOC, GPIO_Pin_2);
	GPIO_SetBits(GPIOC, GPIO_Pin_0);
	GPIO_SetBits(GPIOC, GPIO_Pin_3);
}
//prototypes of the rotation functions
void fnc_rotateCCW(void);
void fnc_rotateCW(void);

int main(void)
{
	GPIO_InitTypeDef GPIO_InitStruct;
	//Set the pin working mode as output.
	GPIO_InitStruct.GPIO_Mode = GPIO_Mode_OUT;
	GPIO_InitStruct.GPIO_OType = GPIO_OType_PP;
	//Set the required pins
	GPIO_InitStruct.GPIO_Pin = GPIO_Pin_0 | GPIO_Pin_1 | GPIO_Pin_2 | GPIO_Pin_3 | GPIO_Pin_4 | GPIO_Pin_5;
	GPIO_InitStruct.GPIO_PuPd = GPIO_PuPd_UP;
	GPIO_InitStruct.GPIO_Speed = GPIO_Speed_50MHz;
	//And initialize the configuration.
	GPIO_Init(GPIOC, &GPIO_InitStruct);

	//decide the rotation direction
	if(  GPIO_ReadInputDataBit(GPIOC, GPIO_Pin_4)  && !(GPIO_ReadInputDataBit(GPIOC, GPIO_Pin_5)) ){
		fnc_rotateCW();
	}
	else if(  !(GPIO_ReadInputDataBit(GPIOC, GPIO_Pin_4))  && GPIO_ReadInputDataBit(GPIOC, GPIO_Pin_5)   ){
		fnc_rotateCCW();
	}
}
That is all in this article.
Have a good DC motor controlling.
Burak hamdi TUFAN
Tags
Share this Post
Author

I am a software developer experienced 15 years and here to share all my programming experiences. I have worked on so many platforms and programming languages especially C, C#, C++ and Java. I am studing PhD at Kocaeli University on Aviation Technologies. I am building softwares and technologies on aviation.

USART DMA Communication in STM32 CubeMx

Comments