How to create Custom Item in Qt QML
Hello everyone, in this article we are going to talk about creating a custom item in Qt QML. We will use clicking and hovering actions on created custom item in QML.Let's get started.
In this article we are going to make a custom item in Qt QML and we are going to add some simple behaviours to created item.
Firstly add a new QML file under resources then exemine the below code block. In this example I named as CustomItem
import QtQuick 2.0
Item {
    id: itemContainer
    property alias rectColor: textContainer.color
    property alias textInside: textInRect.text
    signal hovered(rectColor : color)
    signal clicked()
    width: 50
    height: 35

    Rectangle{
        id: textContainer
        anchors.fill: parent
        color: rectColor
        Text {
            id: textInRect
            text: qsTr(textInside)
            anchors.fill: parent
        }
    }

    MouseArea{
        anchors.fill: parent
        hoverEnabled: true
        onHoveredChanged: itemContainer.hovered(itemContainer.rectColor)
        onClicked: itemContainer.clicked()
    }
}
What have we done in above code block
Now we need to configure our Main Window in our application. I will show multiple items so I will use a Grid and I will place my custom component in this Grid. Also I will locate a text and hovering on custom items will change the color of this text on mainwindow.
Below code block you will see my main.qml content
import QtQuick 2.9
import QtQuick.Window 2.2

Window {
    id: mainWindow
    visible: true
    width: 320
    height: 240
    color: "gray"
    title: qsTr("Qt QML Example - Thecodeprogram")
    Text {
        id: txtContent
        text: qsTr("Burak Hamdi TUFAN")
        x: 10
        y: 150
        color: "white"
        font.pixelSize: 25
    }
    Grid{
        id: colorSelector
        rows:2
        columns: 3;
        spacing:2
        x:10
        y:10

        CustomItem {rectColor: "red"; textInside: qsTr("Burak"); onHovered: txtContent.color = rectColor; }
        CustomItem {rectColor: "blue"; textInside: qsTr("Hamdi"); onHovered: txtContent.color = rectColor;   }
        CustomItem {rectColor: "purple"; textInside: qsTr("TUFAN"); onHovered: txtContent.color = rectColor;   }
        CustomItem {rectColor: "lime"; textInside: qsTr("The"); onHovered: txtContent.color = rectColor;  }
        CustomItem {rectColor: "green"; textInside: qsTr("Code"); onHovered: txtContent.color = rectColor;  }
        CustomItem {rectColor: "orange"; textInside: qsTr("Program"); onHovered: txtContent.color = rectColor;  }
    }
}
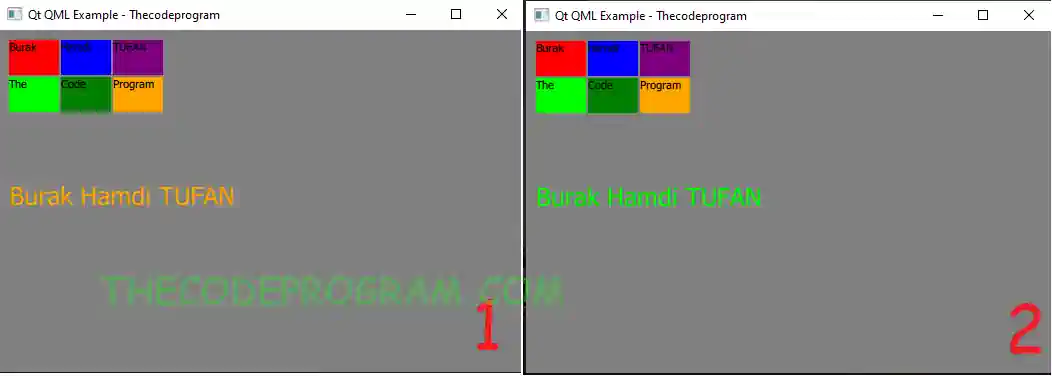
When you move on our buttons, you will see the color or the text will be changed according to color of component. Below image you can see the example output.


That is all in this article.
Have a nice customizing.
Burak Hamdi TUFAN
Tags
Share this Post
01/12/2015
C# ile Delegate - Temsilci Kullanımı
26/11/2019
Serial Communication with QT-GUI C++
18/04/2020


Comments
signal hovered(rectColor : color) satırının hata vermesinin sebebi ve olası çözümleri nelerdir?
2022/06/25 16:07:49Merhabalar, yazıdaki kodlar ile karşılaştırma yapınız. Muhtemelen unutulmuş bir nokta bulunmaktadır. Ben bu yazıyı hazırlarken yazdığım örnek uygulama çalışmaktadır. Diğer bir ihtimal framework ile ilgili bir değişiklik olmuş olabilir. Bunu öğrenmek için QML dökümanlarını inceleyiniz, yazdığınız kodu görmeden birşey demek doğru olmaz
2022/06/27 22:45:11