
Reading Detailed System Information with QT C++
Hello everyone, in this article we are going to read system software and hardware information in Qt C++. We will use QSysInfo, QStorageInfo, QNetworkInterface, QSettings, QProcess classes in our application.Let's get started.
In this application I will create a console application with Qt C++.
Below code block you will see it:
QT += core
QT += network
Now I will use the cout command to print the values on the console so I need to include below libraries.
#include <iostream>
using namespace std;
And We have to include below libraries in project file.
#include <QSysInfo>
#include <QStorageInfo>
#include <QNetworkInterface>
#include <QSettings>
#include <QProcess>
Here first we are going to use QSysInfo Class.
QSysInfo class has static methods to get system values. QSysInfo will not provide all informations about the device. Some of the informations whic QSysInfo provides is in below code block.
    system("title SystemInfo_Example - Thecodeprogram");
    cout << "QT C++ System Info" << endl;

    cout << "QSysInfo Class" << endl;
    cout << "CPU Architecture : " << QSysInfo::currentCpuArchitecture().toLocal8Bit().constData() << endl;
    cout << "Product Type : " << QSysInfo::prettyProductName().toLocal8Bit().constData() << endl;
    cout << "Kernel Type : " << QSysInfo::kernelType().toLocal8Bit().constData() << endl;
    cout << "Kernel Version : " << QSysInfo::kernelVersion().toLocal8Bit().constData() << endl;
    cout << "Machine ID : " << QSysInfo::machineHostName().toLocal8Bit().constData() << endl;
    cout << "-----------------------------------------------------------------" << endl;
Below image you can see the output.

Now We use QStorageInfo class to get mounted hard drive informations. We are going to read the name, rootpath, filesystem, and disk spaces of the mounted hard drives.
Below code block you will see it.
    cout << "QStorageInfo Class" << endl;
    cout << "Mounted Volumes" << endl;
    foreach (const QStorageInfo &storage, QStorageInfo::mountedVolumes()) {
        if (storage.isValid() && storage.isReady()) {
            if (!storage.isReadOnly()) {
                cout << "Name:" << storage.name().toLocal8Bit().constData() <<  " ";
                cout << "Root:" << storage.rootPath().toLocal8Bit().constData() <<  " ";
                cout << "FileSys:" << storage.fileSystemType().constData() <<  " ";
                cout << "Disk Spaces:";
                cout << storage.bytesAvailable()/1000000000 <<  "GB";
                cout << "/";
                cout << storage.bytesTotal()/1000000000 <<  "GB";
                cout <<  endl;
            }
        }
    }
Below image you can see the output of the program.

After that we are going to read the Network status of the device. To get the network status of the device we are going to use QNetworkInterface class.
With QNetworkInterface class we are going to get Which interfaces are active and device IP number on these active interfaces. Also we are going to get device MAC adresses on these interfaces.
Below code block you will see how we did it:
    cout << "QNetworkInterface Class" << endl;
    cout << "Connected Network Informations" << endl;

    foreach(QNetworkInterface networkInterface, QNetworkInterface::allInterfaces())
    {
        if (networkInterface.flags().testFlag(QNetworkInterface::IsUp) && !networkInterface.flags().testFlag(QNetworkInterface::IsLoopBack))
        {
            foreach (QNetworkAddressEntry entry, networkInterface.addressEntries())
            {
                if ( entry.ip().toString().contains(".")){
                    cout << "Interface:"<< networkInterface.name().toLocal8Bit().constData() << " ";
                    cout << "IP:"<< entry.ip().toString().toLocal8Bit().constData() << " ";
                    cout << "MAC:"  << networkInterface.hardwareAddress().toLocal8Bit().constData() << endl;
                }
            }
        }
    }

    cout << "-----------------------------------------------------------------" << endl;
And the output of the example like will be below.

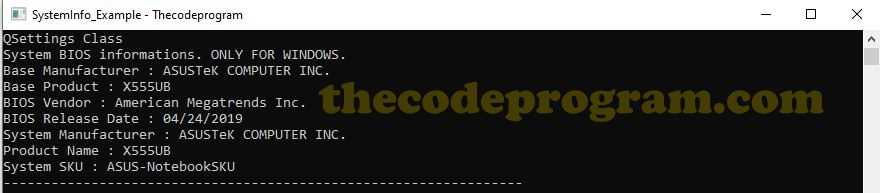
Now QSettings class' turn.
We are going to access the system registry with the QSettings class and fetch some informations from there. System registry keeps the some of system informations like bios informations and also CPU informations. Here I will get the some of bios information of the device.
Below code block you will see it.
    cout << "QSettings Class" << endl;
    cout << "System BIOS informations. ONLY FOR WINDOWS." << endl;

    QSettings settings("HKEY_LOCAL_MACHINE\\HARDWARE\\DESCRIPTION\\System\\BIOS", QSettings::NativeFormat);
    cout << "Base Manufacturer : " << settings.value("BaseBoardManufacturer", "0").toString().toLocal8Bit().constData() << endl;
    cout << "Base Product : " << settings.value("BaseBoardProduct", "0").toString().toLocal8Bit().constData() << endl;
    cout << "BIOS Vendor : " << settings.value("BIOSVendor", "0").toString().toLocal8Bit().constData() << endl;
    cout << "BIOS Release Date : " << settings.value("BIOSReleaseDate", "0").toString().toLocal8Bit().constData() << endl;
    cout << "System Manufacturer : " << settings.value("SystemManufacturer", "0").toString().toLocal8Bit().constData() << endl;
    cout << "Product Name : " << settings.value("SystemProductName", "0").toString().toLocal8Bit().constData() << endl;
    cout << "System SKU : " << settings.value("SystemSKU", "0").toString().toLocal8Bit().constData() << endl;

    cout << "-----------------------------------------------------------------" << endl;
Below image you can see the output of the example:
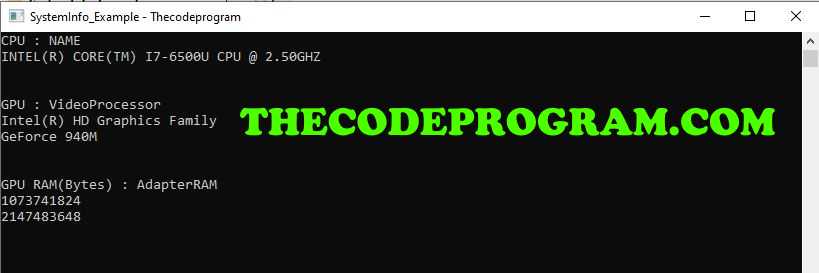
And the last method to read system values is use the command line with QProcess. You will see this method when you try to search on the internet with C#. They are using the similar commands.
Here I will get the CPU name, GPU name and GPU ram informations.
    QProcess process_system;
    QString system_output;

    if(QSysInfo::kernelType() == "winnt")
    {
        QString cpuname = "wmic cpu get name";
        process_system.start(cpuname);
        process_system.waitForFinished();
        system_output = process_system.readAllStandardOutput().toUpper();
        cout << "CPU : "  << system_output.toLocal8Bit().constData() << endl;

        QString gpuname = "wmic PATH Win32_videocontroller get VideoProcessor ";
        process_system.start(gpuname);
        process_system.waitForFinished();
        system_output = process_system.readAllStandardOutput();
        cout << "GPU : "  << system_output.toLocal8Bit().constData() << endl;

        QString gpuRam = "wmic PATH Win32_VideoController get AdapterRAM";
        process_system.start(gpuRam);
        process_system.waitForFinished();
        system_output = process_system.readAllStandardOutput();
        cout << "GPU RAM : "  << system_output.toLocal8Bit().constData() << endl;
    }
    if(QSysInfo::kernelType() == "linux")
    {
        QString linuxcpuname = "cat /proc/cpuinfo | grep 'model name' | uniq";
        process_system.start(linuxcpuname);
        process_system.waitForFinished();
        QString linuxOutput = process_system.readAllStandardOutput();
        cout << "Linux CPU Info : "  << linuxOutput.toLocal8Bit().constData() << endl;
    }
Output of the program for my computer like below:
As you can see our example is ready. We are ready to read system informations. You can customize the above example according to your requirements.
You can reach the example application on Github via : https://github.com/thecodeprogram/SystemInfo_Example
Have a good system informations reading.
I wish you have healthy days.
Burak Hamdi TUFAN
Tags
Share this Post
Author

I am a software developer experienced 15 years and here to share all my programming experiences. I have worked on so many platforms and programming languages especially C, C#, C++ and Java. I am studing PhD at Kocaeli University on Aviation Technologies. I am building softwares and technologies on aviation.


C# HttpWeb Request ile Web Servis Kullanımı
Comments
I am using your example reading detailed systems information with Qt Creator in windows 10, everything is good only the final part, I cannot get CPU name, GPU name, and GPU ram information. I don't not display any things. Please have any recommendations to resolve the problem.
2021/03/15 17:51:16Hello, There can be a Few reasons. So Guessing will be hard at this position. Have you tried to run my code file on github which I shared at the end of article. Maybe something missing. I recommend you to control the source file on github. Thank you very much
2021/03/16 10:33:53