
How to use Speech to Text in Android
Hello everyone, in this article we are going to talk about SpeechRecognizer class for Speech to Text specification in android. We are going to make an example and implement Speech Recognizer class with Java language in Android Studio.Let's get started.
Before we start to write codes first we have to exemine the offical document for development notes via https://developer.android.com/reference/android/speech/SpeechRecognizer
One of Most important thing which placed in official document,
Let's write some code now :)
Place below permissions AndroidManifest.xml file.
<uses-permission android:name="android.permission.RECORD_AUDIO"/>
<uses-permission android:name="android.permission.INTERNET"/>
Now prepare the simple layout. I will add a EditText and ImageButton in the layout.
activity_main.xml
<?xml version="1.0" encoding="utf-8"?>
<LinearLayout xmlns:android="http://schemas.android.com/apk/res/android"
    xmlns:tools="http://schemas.android.com/tools"
    android:layout_width="match_parent"
    android:layout_height="match_parent"
    tools:context=".MainActivity"
    android:orientation="vertical">

    <EditText
        android:layout_width="match_parent"
        android:layout_height="wrap_content"
        android:id="@+id/txtRecognizedSpeech" />

    <ImageButton
        android:id="@+id/btnSpeech"
        android:layout_width="123dp"
        android:layout_height="93dp"
        android:layout_gravity="center"
        android:src="@android:drawable/ic_btn_speak_now" />
</LinearLayout>
Our layout is ready, and now we are good to write codes. In our MainActivity class first we need to declare requred variables.
Below code block you can see the required variables and components for our task.
    private SpeechRecognizer speechRecognizer;

    private EditText txtRecognizedSpeech;
    private ImageButton btnSpeak;

    private Boolean isListening = false;
    private int RecordAudioRequestCode = 1;
We also check the permission is Granted. Below code block will do this task for us. Do not forget to implement below override code block.
    @Override
    public void onRequestPermissionsResult(int requestCode, @NonNull String[] permissions, @NonNull int[] grantResults) {
        super.onRequestPermissionsResult(requestCode, permissions, grantResults);
        if (requestCode == RecordAudioRequestCode && grantResults.length > 0 ){
            if(grantResults[0] == PackageManager.PERMISSION_GRANTED)
                Toast.makeText(this,"Permission Granted",Toast.LENGTH_LONG).show();
        }
    }
Then, in onCreate method of the activity, first of all we have to check the permission is granted for above API23 devices. Below code block will do this task.
if(ContextCompat.checkSelfPermission(this,Manifest.permission.RECORD_AUDIO) != PackageManager.PERMISSION_GRANTED){
            if (Build.VERSION.SDK_INT >= Build.VERSION_CODES.M) {
                ActivityCompat.requestPermissions(this,new String[]{Manifest.permission.RECORD_AUDIO},RecordAudioRequestCode);
            }
        }
Then initialize the declared variables above:
txtRecognizedSpeech = findViewById(R.id.txtRecognizedSpeech);
btnSpeak = findViewById(R.id.btnSpeech);
speechRecognizer = SpeechRecognizer.createSpeechRecognizer(this);
Later we have to initialize the Speech recognition Intent with required configurations. Below configurations we set the language as device default language.
final Intent speechRecognizerIntent = new Intent(RecognizerIntent.ACTION_RECOGNIZE_SPEECH);
speechRecognizerIntent.putExtra(RecognizerIntent.EXTRA_LANGUAGE, Locale.getDefault());
Then, we set the Speech Recognition Listener with below override methods.
In this code block I have removed the unused override methods to prevent confusing. When you implemented this listener make sure all override methods are exist.
        speechRecognizer.setRecognitionListener(new RecognitionListener() {

            @Override
            public void onBeginningOfSpeech() {
                txtRecognizedSpeech.setHint("Listening...");
            }
//         ...
//        ....
//        ...
//        ...
            @Override
            public void onResults(Bundle bundle) {
                ArrayList<String> speechData = bundle.getStringArrayList(SpeechRecognizer.RESULTS_RECOGNITION);
                txtRecognizedSpeech.setText(speechData.get(0));
            }

        });
And lastly we need to define our button click event listener to manage the starting and stopping the audio listener intent.
btnSpeak.setOnClickListener(new View.OnClickListener() {
            @Override
            public void onClick(View v) {
                if (isListening.equals(true)){
                    speechRecognizer.stopListening();
                    isListening = false;
                }
                else if (isListening.equals(false)){
                    speechRecognizer.startListening(speechRecognizerIntent);
                    isListening = true;
                }
            }
        });
Above code blocks our onCreate method is ready. Now As official document said before we need to destroy this service to prevent the draining the battery. So we need to implement the onDestroy method like below.
    @Override
    protected void onDestroy() {
        super.onDestroy();
        speechRecognizer.destroy();
    }
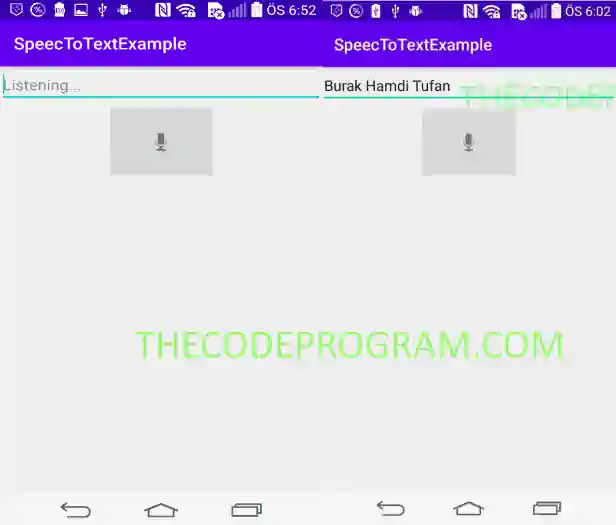
Below image you can see the output of the example application.
That is all in this article.
You can reach the example files on Github via : https://github.com/thecodeprogram/TheSingleFiles/tree/master/Android_Java_SpeechToTextExample
Burak Hamdi TUFAN.
Tags
Share this Post
Author

I am a software developer experienced 15 years and here to share all my programming experiences. I have worked on so many platforms and programming languages especially C, C#, C++ and Java. I am studing PhD at Kocaeli University on Aviation Technologies. I am building softwares and technologies on aviation.

26/03/2020
Explanation of Android Services with Example

13/04/2020
How to use Shared Preferences in Android

01/09/2020
Comments